Puppy Gate

So I have a 13 month old English Mastiff (@hafthor_mastiff) and when I’m not home he gets a bit of separation anxiety and has to destroy something! So I’ve blocked him off in a certain area where he supposedly can’t do too much harm. However, he finds a way to get past my defenses 🙂

I purchased a couple of baby gates. One is a bit shorter than the other, so I’ve had to add extra protection for that, however, I just got a newer taller gate to replace it with. That said he still can put his front paws on the gate and then using leverage jump over… so I thought maybe I’d put little 3D printed “spikes” on top of the gate to deter him from jumping over the gates.

We were recently playing catch and he broke the gate, so I’m also planning on making a re-enforcing part for that section of the gate.

Starting my project. First off I want to work on re-enforcing the gate, since he broke that section where it latches and he would only have to nudge the door to open it now. I took a photo <soon to go here> and I’m going to bring that into Fusion 360, so I have a shape to work with. I then measure with my digital calipers the width and height of the section, which I can then use in fusion to size things up appropriately.

3D printing lithophanes

lithopane

So it has been a while since I’ve posted. I started a new job and only the second week-in I came down with the flu, so I’ve been busy and sick.

I’ve done a lot even with all that going on, but just haven’t had the time to post about it. For Valentine’s I made a custom heart shaped earring holder, I created a Rube Goldberg valentine’s box for my youngest son (his design). I created a new rpi camera mount for my Prusa i3 MK2, I’ve made progress on an enclosure for my Prusa, and lastly create my first lithophane.

I’ve seen numerous posts in the past 6 months or more of people creating lithophanes of family photos, spherical moons, etc… So I thought I’d create one today. I took an old photo and a couple of hours later I had a pretty cool lithophane. However, I knew there was a inverse option in the software I used, so I thought I’d try that next. The results are AMAZING! It is like having a physical photo!

https://photos.app.goo.gl/ITevzQHwQFeobXt13 

I recommend using this site for creating your lithophane: http://3dp.rocks/lithophane/ It makes it super easy! I would make sure to click on Settings –> Image Settings  and then move the slider to the left for Positive Image. This will make it so the photo will show up when light source is behind the lithophane.

Update: I also like this site for creating lithophanes! https://lithophanemaker.com/

Azure Functions and Logic Apps

I wanted to create a simple Azure Function to make an HTTP GET Request to my website, which is hosted on the cheapest GoDaddy subscription. This subscription is on shared hosting and I don’t have much control over it. The initial load time of the WordPress site is CRAZY slow… in the ~22 second range! After the initial load time I’m seeing anywhere from 5-9 seconds load time. So I thought I’d create a keepalive function to make a HTTP GET Request once every 4 minutes, since the app pool shuts down after 5 minutes of inactivity. At first I created a SUPER simple Python script to do this, and it worked well….. Until it didn’t. I wasn’t home for a couple of days and it stopped working. I was running it on a RPi at home. However, I didn’t have any kind of VPN setup, so I could login remotely to see what the issue was. I thought, heck, I’ll create a super quick Azure Function based on a timer to ping the site instead. That way I can see if there are issues online anywhere I have internet access and potentially fix the issue also.

I did that and it worked well. However, I started to notice some issues… The interval not kicking off every 4 mins like I set it up to do, and some communication service errors. The communication service error I attribute to potentially the sight being down at GoDaddy for maintenance or something similar. The not kicking off every four minutes??? I’m not sure what that issue might be attributed too, minus, maybe Azure maintenance?

I decided to replace all of this with a Azure Logic App. I started looking at an Azure Logic App, since I could easily create a workflow, that I could maintain. For example, I make the request every four minutes, if for some reason, I get a HTTP status code greater than or equal to 300 I can send myself a text message. In addition, it is really easy to hook it up to log to Azure Table Storage. Well there was a bit of trial and error to set it up, but I was able to figure it out in about 10 mins or so….

To insert into table storage the designer wants you to create valid json. The key for me was figuring out how to insert a GUID for the RowKey. See the syntax below:

{
"Body": "Body goes here",
"Headers": "@{outputs('HTTP')['headers']}",
"PartitionKey": "fsnKeepAlive",
"RowKey": "@{guid()}",
"StatusCode": "@outputs('HTTP')['statusCode']"
}

The @outputs sections were automatically created for me using the GUID, but I had to figure out that there was a guid function available in this context and the correct syntax.

In summary, the Azure Function gives a lot of control, but requires a but of coding. The Azure Logic App doesn’t require much “coding” AND provides a lot of features though the extensive list of integrations.

Happy 2018

I haven’t posted in a couple of weeks, so I figure I better get to it. I have a number of things I’ve been working on in the new year.

  • I’ve been watching some Pluralsight videos on Angular. I’ve learned Angular a couple of years back and it has changed a bit, so time to pick it up again.
  • I’ve started learning about docker. I created a simple docker application, ran it on my Mac, my PC, and then ran it on a simple Azure Ubuntu VM.
  • I created a new keepalive “service”. I had one running on my RPi at home, but when I was away for a couple of days… I realized it had stopped working. I don’t have a personal VPN into my house to figure out why, so I decided to create a super simple Azure Function to do the same thing. That way I can monitor and maintain it anywhere.
  • I’ve also been busy 3D printing for my son’s cub scouts. I created a blue mustang pinewood derby car body!
    • In addition, I’m going to be 3D printing their names, pack number, and year for their Arrow of Light plaques.

On top of all of this I’ve been studying various algorithms from my college days as these days hiring employers like to test you’re thought process by giving you academic problems to solve and see the thought process as you go through to solve them.

I’ve been pretty busy and since it is a new year, I want to make some goals for 2018. These are not set in stone, but goals I would like to achieve. These are not in any order.

2018 Goals:

  • Complete at least one online course a month about technology. Be it to learn a new language or just to improve my craftsmanship.
  • Listen to two technology podcasts a week.
  • Listen to one book a week (I use Audible a lot).
  • Play tennis at least once a week.
  • Drink no more than one mocha a week.
  • Stop drinking soda (unless it is with rum on the weekends).
  • Workout three days a week for at least 30 minutes at a time.

I think these are doable goals and just the start, I’d like to add more, but I also want to make sure I make reasonable goals.

Like the title says… Happy 2018!

Noise Maker – Ring in the New Year!

As I mention in my Kitchen Towel Rack post: I printed the Party Noise Maker by Works by Solo on my Prusa i3 MK2 at 240%. I first saw this Party Noise Maker on a youtube video by Joel Telling.

Well I should play the lottery! Check this out!

I knew I was going to be cutting it close because the filament roll was getting low, but wow! I can’t believe I lucked out! I don’t have a filament sensor, so it would have been a failed print. I was in bed and using the Printoid app to view the print and I saw some orange behind the extruder, so I thought… ugh a failed print!?!? So I threw on my pajamas and ran down stairs to my surprise! hahaha I’m seriously going to buy a few lottery tickets today! haha

If you want to see all of the photos and timelapse video click this link: https://photos.app.goo.gl/5rSxSfz2vPbDiil92

Once I get showered and dressed, I’ll go outside and test out the noise maker!


Kitchen Towel Rack

So we used to have two kitchen towel racks, but one broke a while back. I took the old one and measured it out and then sketched it on a piece of paper with the dimensions. Then I opened up Fusion 360, and created a couple sketches and here is what I came up with:

Once I’m done printing the 240% Party Noise Maker by Works by Solo on my Prusa i3 MK2, I’ll print this out and and upload a photo of the final results. I first saw this Party Noise Maker on a youtube video by Joel Telling.

Handling signal TERM in Python

I had an issue with the lights staying on after stopping the python script using start-stop-daemon, because I wasn’t handling the terminate signal that it passes to the script.

By default, when you call start-stop-daemon with –stop argument it sends a signal TERM (terminate). To handle this signal I created a class that registers a callback method for signal.SIGTERM. That method then sets a flag. So when start-stop-daemon is called with the –stop argument it will call the method and set the flag. In my main while loop I now check that flag and if it is set then I quit the code and clear the GPIO pins.

class CancellationToken:
    cancel_now = False
    def __init__(self):
        signal.signal(signal.SIGINT, self.exit_gracefully)
        signal.signal(signal.SIGTERM, self.exit_gracefully)

    def exit_gracefully(self,signum, frame):
        self.cancel_now = True
...


while not request.cancel_now:
    #do stuff here... and stop once the service receives
    # a TERM signal

Turning a python script into a service

So now that I have my build lights I want the python script that controls the lights to be setup to run as soon as the RPi is turned on. So I needed to find a way to setup the python script as a service. I found a REALLY good blog post by Stephen Phillips on how to do this pretty easily.

It worked great! I only noticed one issue that I still need to investigate. If I stop the service the GPIO channels are not closed properly, so the lights will stay on.

Here are some things I’d like to do next:

  • I need to incorporate the code for the TeamCity Provider, so it will query a TeamCity build server (instead of the current test code).
  • Since, I don’t have a TeamCity build server currently I’ll need to make a synthetic or stub service that provides sample output from a TeamCity Build box.
  • Then I would like to build out other providers beyond TeamCity, so it could work with CC.NET or VSTS continuous build servers.
  • Once I create those, create a Python Service Locator, so based on configuration it will choose the correct provider.

Build Lights

A few years back I created some build lights for our Continuous Integration (CI) server. You maybe asking “What are build lights?”. Well in a continuous integration server every time a developer checks in code to a source control repository it triggers an event on the CI server. The CI server will typically download the latest code from the repository build it and run all the unit tests. If all the test pass then it will typically copy the latest code to your development environment. If it fails people want to know ASAP, so they can fix whatever broke the build.

Build lights are the physical signal of whether or not all the unit tests have passed or they have failed.

When I built this project 3+ years ago I used a RPi to query our TeamCity CI Server using their XML REST based API. I wrote a script in python that polls the status every N seconds. If ANY of the unit tests fail a red LED would light up! This was the signal to the developers AND the project manager something was wrong. The best part was seeing how the other developers reacted. We had a number of unit tests that were failing for weeks and no one was fixing them, within 2 hours after I setup my RPi with the build lights the developers on the team had fixed ALL of unit tests that were having issues! 🙂

After that it was like a challenge to see who would fix the issue when the light would go red. In fact, the project manager would even jump in and ask why is the light red? It was amazing to see the effect it had on the team!

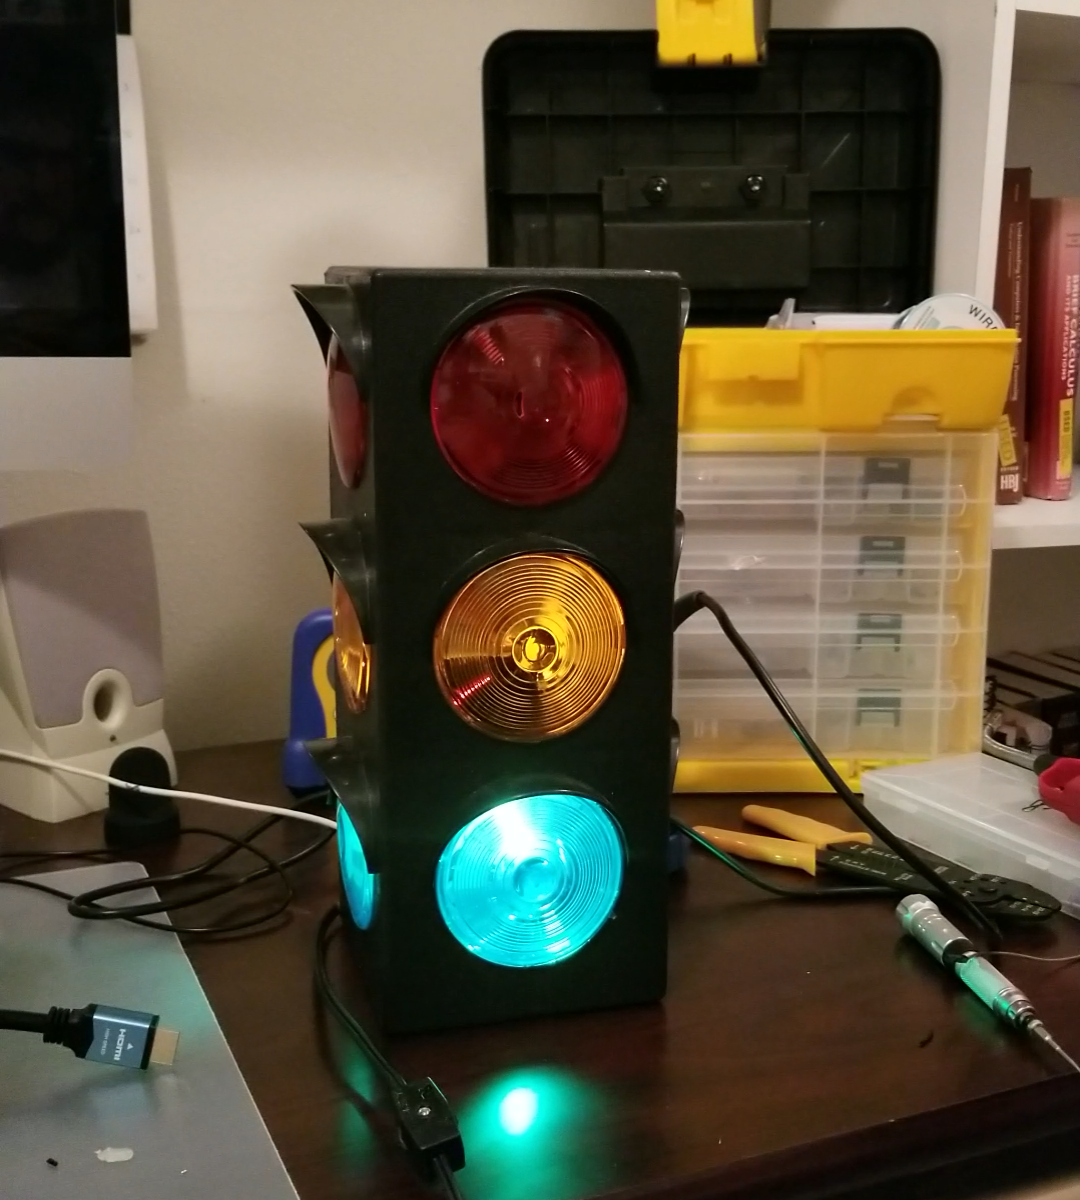
The reason I bring this up today and I’m blogging about it is… I’ve finally got around to hooking up the RPi to a stop signal that I bought on Amazon. To hook up a RPi to mains voltage I used a SainSmart 4-channel 5V relay.

Check out the video!Â